LEDautomotive.com

  • LED Technology

    LEDs are the future of automotive lighting. We do our best to stay on top of the latest LED technology to bring you the best, brightest LEDs available.
  • Automotive Kits

    There are multiple LEDs that will fit a particular application. We test each type of LED to ensure that that we offer the best possible solution for your needs.
  • Eco-friendly

    LEDs are better for the environment than regular bulbs. They use less energy and do not contain any hazardous materials or gasses..
  • LED Types

    Our LED lamps utilize standard miniature, high flux, high powered and ultra high powered LEDs.
  • Multiple Colors

    We offer 4 main colors to choose from. Most of our LED lamps come in white, blue, red and green colors.

Cart  

(empty)
CLIMATE INDICATORS INSTALLATION GUIDE
01-05 Honda Civic

*Please read this all the way through before doing this install!*
We will not be held responsible for any mistakes, problems, or damage done to any part of your car. Follow this install guide carefully, and you should have no problems. If you are unsure about ANYTHING, please email us. We will help you out to the best of our ability.

Here Is What You Will Need:
- Phillips head screw driver
- Flat head screw driver

  The following items are not needed for solerless kits
- A fine point soldering iron ($8 - RadioShack part number: 64-2051)
- Solder (can be found at RadioShack for around $4)
- De-soldering braid ($3 - RadioShack part number: 64-2090)
- Tweezers


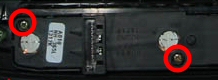
Follow the steps in the Climate Control Installation Guide to remove the climate control unit.


Remove the 2 screws that hold the button casing together and remove the circuit board.


After removing circuit board containing the 3 indicator LED’s identify the “+” (anode) and “-“ (cathode) of each LED. These LED’s are located on the larger “tower holders” as shown below.


De-solder each solder point using either “De-Soldering Braid” or a “Solder Pump”. Be sure to do perform this action as quick as possible to avoid overheating and damaging components. Once the solder is removed, you can take the LED out. DO NOT FORCE the lead out, if there is resistance, there is still some solder holding the LED in the board. use the braid or the pump to remove the solder.


Next, put the LED's in with the longer lead going into the + hole (see picture in the above step). If the LED lead does not go into the hole DO NOT FORCE IT, use the solder braid or the pump to clean out the solder a little more until the LED just slips in. P
roceed to solder the LEDs to the board by putting some solder on the back side of the board to connect the LED leads to the circuit board.


HomeHome