CLIMATE CONTROL & CLOCK KIT INSTALLATION GUIDE
98-02 Honda Accord (Auto Climate)
*Please read this all the way through before doing this install!*
| We will not be held responsible for any mistakes, problems, or damage done to any part of your car. Follow this install guide carefully, and you should have no problems. If you are unsure about ANYTHING, please email us. We will help you out to the best of our ability. |
| Here Is What You Will Need: |
- Small amount of electrical tape
- Phillips head screw driver
- Flat head screw driver
- Tweezers
The following items are not needed for solderless kits
- A fine point soldering iron ($8 - RadioShack part number: 64-2051)
- Solder (can be found at RadioShack for around $4)
- Crescent wrench |
The first things we need to do are getting the console off and get the climate control, and clock apart. Firmly grasp the clock on both sides and pull it straight out. It's a little tough but there's just clips holding it there. Remove the two connectors from the clock and set it aside. Now there's a little screw behind where the clock was. Be careful when taking this screw out, If it falls, you may never see it again.
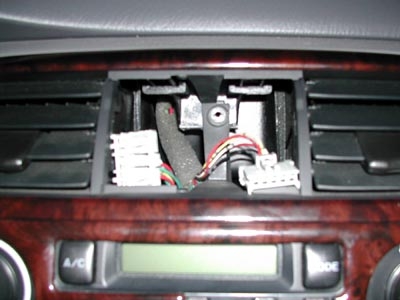

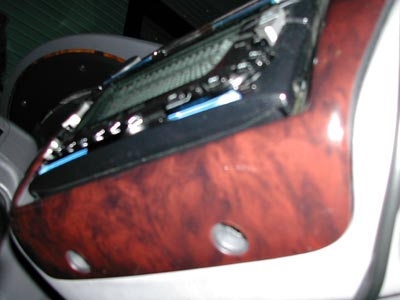
There are two screws under the bezel for the climate control. I have the factory wood stereo bezel so yours may look different but the screws are in the same place.
Pull the center console out, be gentle, it takes a decent tug but don't muscle it because there's wires connected to the climate control. Remove the two connectors from the climate control and take the whole assembly somewhere where you can work and put a soft cloth down so you don't scratch your bezel.
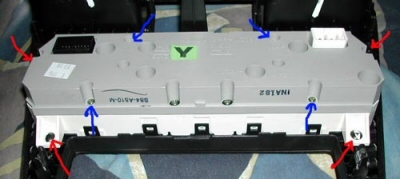
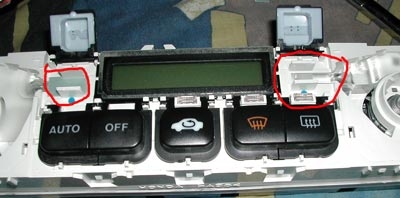
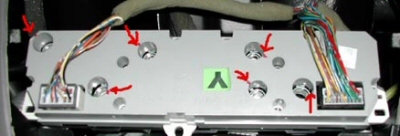
Remove the climate control from the bezel. On this picture there's 4 screws marked with red arrows, remove those screws. You should be able to separate the Climate control from the bezel now. Using that same picture there are 4 screws marked with blue arrows, take those out along with two on the top that are where the top two red arrows are, I forgot to mark those in the picture, sorry. The white back will come off. You can take the bulbs out now, just remember where they go. There should be 6 bulbs, 3 3mm and 3 5mm. The bulbs will come out with a quarter of a counterclockwise twist, and then they lift straight out.
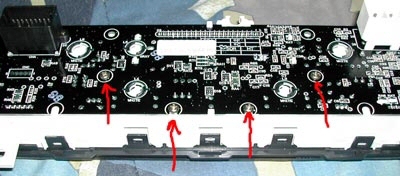
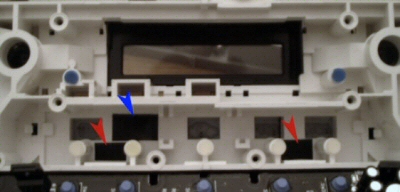
Take out the screws that hold the circuit board down, marked with red arrows on this picture. Make sure you touch something metal to ground yourself before touching the circuit board. Static electricity could ruin the circuit board.
Gently pull the circuit board straight up, and I mean gently, the harnesses for the controls are attached and cannot be removed. You'll see a clear wavy looking thing (diffuser) with a tab on either side, bend the tabs out and remove the wavy thing. Underneath is green filter (pictured below.) Take out the filter. It's tricky, just take your time, it's stuck down with double sided tape. Tweezers work good to grab the filter.
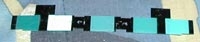
Look where you removed the filter, and you will see 2 square holes. Cut 2 small rectangles of electrical tape to cover these holes. (Red arrows.) This will prevent light from shining from through them. (The factory filter does this, but we removed it, and they need to be blocked.) Tweezers work good to put the electrical tape into position.
If you also purchased the Indicator kit, it is a good time to look at that install guide to minimize your work.
Now put the wavy thing back and gently slide the circuit board back in, don't force it, it should slide in with just a little help. Remember straight in; don't angle it to the side.
Put the 4 screws back in the circuit board, and put the plastic cover back over the circuit board to protect it. You'll notice some black tabs going all the way around the climate control, take a small flat head screwdriver and lift one tab at a time while separating the bezel. When you get this done the front should come off, and the knobs will fall off.
Lift up the two top buttons from the bottom and remove the green filters.
Put the buttons back down, put the knobs back on (if they fell off) and put the front plastic piece back on.
Bulb To LED Conversion (For LEDs that require soldering)
Click [here] for the bulb to LED conversion instructions
Installing the LEDs
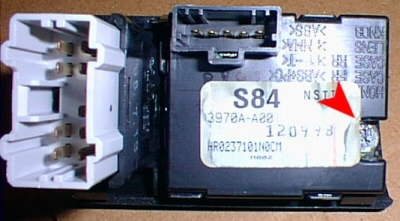
These pictures show which side is + so you know where the anode (the lead with the resistor) should go. If any LEDs do not light up, simply rotate them 180 degrees and test again. The best way to rotate them is:
1. Unlock the LED and plastic base - approx 1/4 turn counter clockwise so it can be removed.
2. Pull the LED and base out of the hole just enough to turn it 1/2 a turn (180 degrees)
3. Put it back in the hole
4. Twist it to lock it in (approx 1/4 turn clockwise).
 | |
|

 LED Technology
 Automotive Kits
 Eco-friendly
 LED Types
  Multiple Colors